
There’s something about a perfectly made bow that instantly adds charm and elegance to just about anything. Whether you're dressing up a gift, spicing up your holiday wreath, or adding a touch of flair to a home decor project, knowing how to make a bow can really elevate your crafting game. The good news? You don’t need any special skills or expensive tools to do it. With just a bit of ribbon and some wire, you can create stunning bows that look like they came straight from a boutique. So, if you’ve ever felt like bows are just too tricky or intimidating to try, keep reading—we’re here to show you how easy it can be.
You might be surprised to learn that making a bow isn’t just for the pros. Whether you're just starting out or have been crafting for years, there’s a bow style that will work for you. From twist bows to double-looped creations and even bouquet-style designs, we’ve got a few different options to explore. Each one brings its own unique vibe, so you can choose the one that best fits your project. The best part? You can reuse the same techniques over and over again, mixing up the ribbon types and sizes to suit your needs.
What’s even better is that once you’ve got the hang of it, making a bow becomes second nature. It’s the kind of skill you can pull out anytime you need a quick touch of handmade beauty. And the more you practice, the easier it gets. So, grab your favorite ribbon and let’s get started on mastering this fun and flexible craft.
- Austin Leatherman Clear Spring Md
- Humane Society Of Huron Valley
- White Eagle Golf Club
- Grand Hotel Riviera Sorrento
- Hoops Cabaret New York Ny
Table of Contents
- Introduction
- Types of Bows to Try at Home
- Materials You’ll Need to Get Started
- Step-by-Step Instructions for Making a Bow
- Creative Ways to Use Your Homemade Bows
- Helpful Tips for Perfecting Your Bow-Making Skills
- Frequently Asked Questions
Types of Bows to Try at Home
When you’re learning how to make a bow, it’s good to know there’s more than one way to go about it. Different types of bows serve different purposes and can vary in complexity, so you can pick the one that fits your project best. Let’s take a quick look at a few popular styles that are beginner-friendly yet look really professional once they’re done.
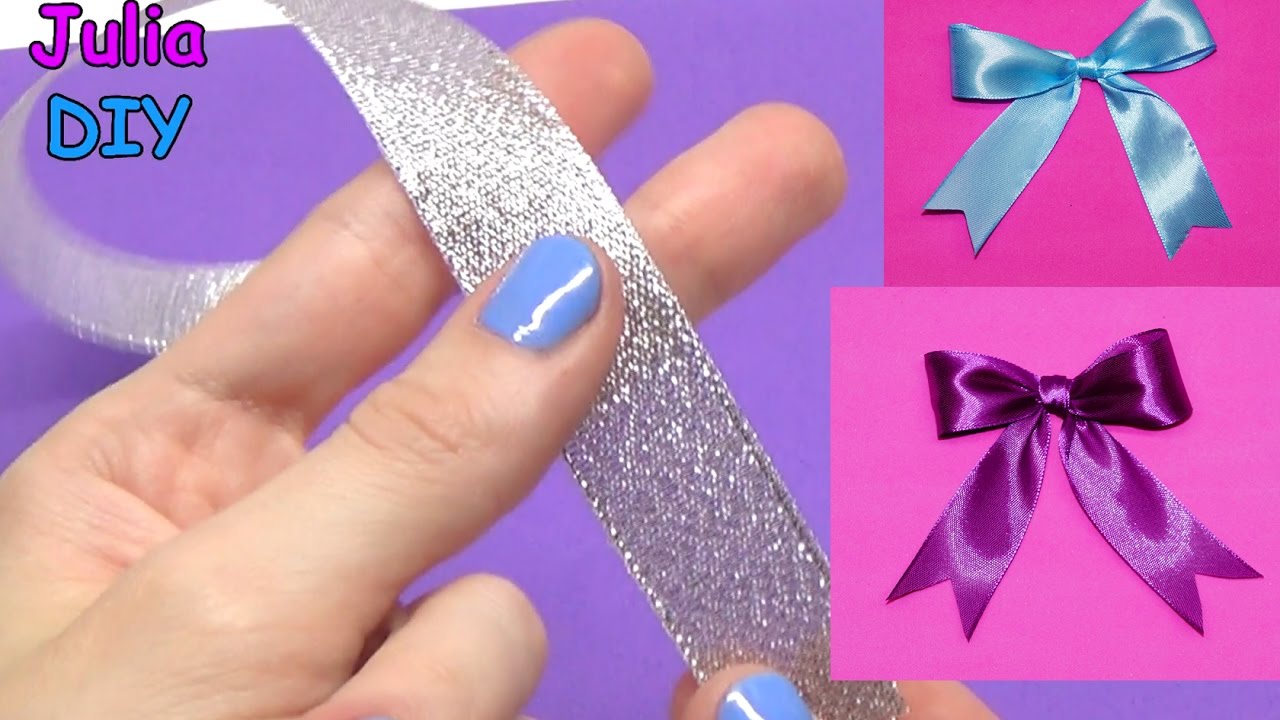
- Twist Bow – This style is great for a more casual or rustic look. It gives off a slightly relaxed vibe and works well with wired or satin ribbon.
- Double-Loop Bow – A classic choice for gift wrapping and wreaths, this bow has multiple loops that give it fullness and dimension.
- Bouquet Bow – Perfect for beginners, this style is super simple and looks just like a little flower bouquet made of ribbon loops.
Each of these styles can be made with just a few basic tools and a bit of ribbon. The best part? You can customize them with different colors, textures, and even add beads or wire centers for extra flair.
Materials You’ll Need to Get Started
If you’ve got a roll of ribbon and a twist tie or floral wire, you’re already halfway there. Here’s what you’ll typically need to make a basic bow:
- 111 W 57th St
- Plano West Senior High
- Ferns And Petals India
- Uci Student Health Center
- Jet Avatar The Last Airbender
- Ribbon (wired or non-wired, depending on your preference)
- Scissors
- Twist ties, floral wire, or a pipe cleaner
- Optional: beads, glue, or a bow maker tool
You can use just about any type of ribbon—satin, burlap, lace, even Christmas ribbon with patterns. The type of ribbon you choose will affect the final look of your bow, so feel free to experiment. If you want your bow to hold its shape better, go with wired ribbon. If you’re going for a softer look, a non-wired option might be better. For more information on selecting the right materials, you can check out this helpful resource.
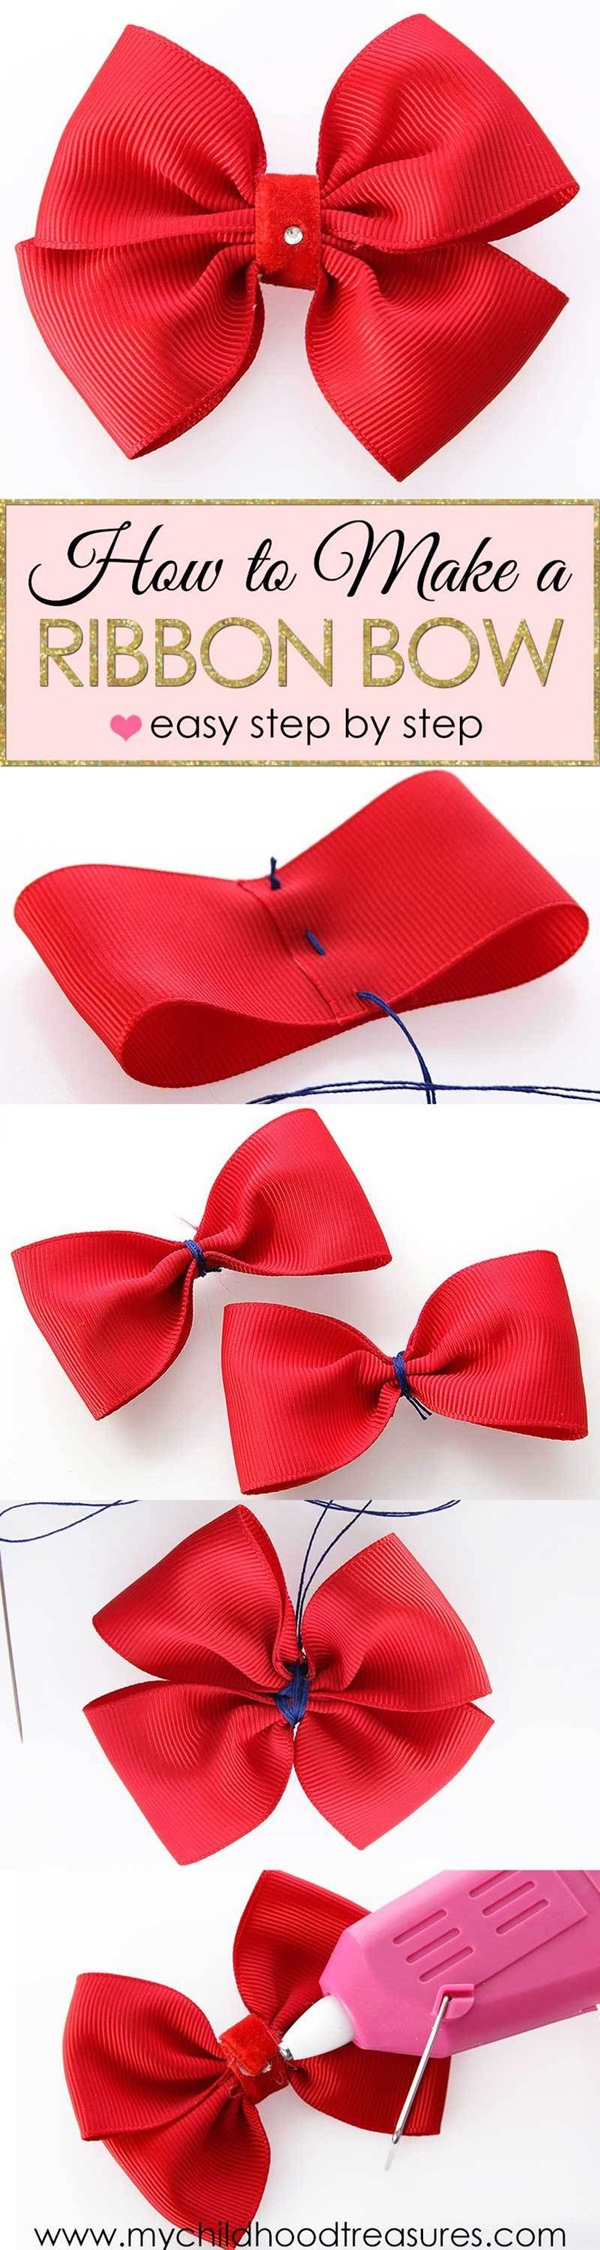
Step-by-Step Instructions for Making a Bow
Okay, let’s get to the fun part—actually making the bow! We’ll walk through how to make a basic double-loop bow, which is a great starting point if you’re new to this.
1. Cut Your Ribbon
Start by cutting a piece of ribbon that’s about 24–30 inches long for a medium-sized bow. If you want a bigger bow, go longer—just keep in mind that more ribbon means a fuller result.
2. Create the First Loop
Take one end of the ribbon and loop it back to form a loop about 3–4 inches across. Hold it in place with your finger.
3. Make the Second Loop
Repeat the same process on the other side, making sure the second loop is the same size as the first one. You should now have two loops with the center section hanging loose between them.
4. Secure the Center
Take your twist tie or floral wire and wrap it tightly around the center of the loops. This is what will hold your bow together and give it that classic bow shape.
5. Fluff and Adjust
Now gently pull the loops outward to make them look full and even. If you made a double-loop bow, you can add more loops by repeating the same process and layering them on top.
That’s it! It really is that easy once you get the hang of it. Once you’ve mastered this basic technique, you can try out different styles like the twist bow or bouquet bow for more variety.
Creative Ways to Use Your Homemade Bows
Once you’ve made your bow, the fun doesn’t have to stop there. In fact, the more you make them, the more you’ll realize just how versatile they are. Here are a few ways you can use your handmade bows:
- Gift Wrapping – A bow is the perfect finishing touch for any wrapped present. Whether it’s a birthday, holiday, or just a little thank-you gift, it adds a personal and thoughtful touch.
- Wreath Decor – Bows are a staple in holiday wreath making. You can attach them to Christmas, spring, or fall wreaths for a classic look that never goes out of style.
- Home Decor – Use bows to dress up pillows, window treatments, or even lampshades. They can instantly brighten up a space with just a little color and texture.
- Signage and Wall Art – If you make farmhouse-style signs or wall art, a bow can be a cute and whimsical accent that pulls everything together.
You can even make a few extra bows to keep on hand for spontaneous decorating or last-minute gift-giving. Once you’ve got a stash of them, you’ll find yourself reaching for them more often than you’d expect.
Helpful Tips for Perfecting Your Bow-Making Skills
Like any craft, making a bow gets easier with practice. But here are a few tips to help you get the most out of your bow-making experience:
- Use wired ribbon for easier shaping. It holds loops better and gives your bow a more polished look.
- Fluff your loops after tying the center. This helps create that full, voluminous shape that makes a bow really stand out.
- Try different ribbon widths. Wider ribbons make bolder bows, while narrower ones are great for delicate accents.
- Layer multiple bows for a more dramatic effect. This is especially nice when making wreaths or centerpieces.
And don’t worry if your first few attempts don’t turn out perfectly. Even the pros had to start somewhere! The more you practice, the more confident you’ll feel. For more DIY inspiration and creative projects, you can on our site to explore other easy craft ideas.
Frequently Asked Questions
Can I make a bow without a bow maker tool?
Absolutely! While bow maker tools can be helpful, they’re not necessary. You can make a beautiful bow using just your hands, ribbon, and a twist tie or floral wire. It’s all about practice and technique.
What kind of ribbon is best for making bows?
Wired ribbon is often the best choice because it holds its shape and makes it easier to create full loops. That said, you can use any type of ribbon you like—satin, burlap, lace, or even patterned ribbon for a fun twist.
How long should my ribbon be to make a bow?
For a standard medium-sized bow, 24–30 inches is a good starting point. If you want a larger or fuller bow, go with a longer piece of ribbon. You can always cut it shorter if needed.
- Boo Did I Scare You Im A Job Application
- Noches De Colombia Elizabeth
- Dining In The Dark
- Dita Von Teese Las Vegas
- Mark Sloan Of Greys Anatomy

Detail Author:
- Name : Mr. Gabe Fadel
- Username : janessa.jacobi
- Email : xosinski@harvey.com
- Birthdate : 1973-08-11
- Address : 285 Nat Garden Port Richieside, MO 62238-9092
- Phone : (909) 448-2164
- Company : Sipes, Schmidt and Wiza
- Job : Gaming Cage Worker
- Bio : Magni sit esse repellat alias pariatur. Id ducimus rerum dicta. Maxime dicta dolor dolores occaecati enim voluptatum consequatur. Explicabo nisi odio eum ad qui laboriosam.
Socials
facebook:
- url : https://facebook.com/goodwinj
- username : goodwinj
- bio : Ipsa facere voluptatem ipsa dolore voluptas aut facilis.
- followers : 2535
- following : 2217
tiktok:
- url : https://tiktok.com/@goodwinj
- username : goodwinj
- bio : Sunt dolorem aperiam odit quia eum quisquam sint.
- followers : 4909
- following : 2874
